
Anchor 自研 EOSIO Signing Request (ESR) 协议的接入指南
作为一个 EOSIO 开源钱包,Anchor 并没有支持 Scatter 协议,而是自研了 EOSIO Signing Request (ESR) 协议。最近接了这个协议,谈谈一些经验,也方便后来者接入更顺利。
首先是几个 Github 地址:
-
https://github.com/greymass/anchor
这是 Anchor 钱包的开源地址,作为接入前了解钱包用,不想看也可以不看。
-
https://github.com/eosio-eps/EEPs/blob/master/EEPS/eep-7.md
这里可以迅速了解 EOSIO Signing Request (ESR) 协议基本原理,了解 EOSIO 的开发者可以快速过,原理并不复杂。
-
https://www.npmjs.com/package/anchor-link
接入的依赖包,接入需要的基本知识这里就都有了。它的 Github 页:https://github.com/greymass/anchor-link
-
https://github.com/greymass/anchor-link/tree/dfdcd55ee34a93cd10ac113712df65570be1611f/examples
接入的代码示例。
其中 login 文件夹的示例:
<!DOCTYPE html> <html lang="en"> <head> <meta charset="utf-8"> <meta name="viewport" content="width=device-width, initial-scale=1.0"> <title>Anchor Link - Login</title> <script src="https://unpkg.com/anchor-link@3"></script> <script src="https://unpkg.com/anchor-link-browser-transport@3"></script> <script> // app identifier, should be set to the eosio contract account if applicable const identifier = 'example' // initialize the browser transport const transport = new AnchorLinkBrowserTransport() // initialize the link const link = new AnchorLink({ transport, chains: [{ chainId: 'aca376f206b8fc25a6ed44dbdc66547c36c6c33e3a119ffbeaef943642f0e906', nodeUrl: 'https://eos.greymass.com', }] }) // the session instance, either restored using link.restoreSession() or created with link.login() let session // tries to restore session, called when document is loaded function restoreSession() { link.restoreSession(identifier).then((result) => { session = result if (session) { didLogin() } }) } // login and store session if sucessful function login() { link.login(identifier).then((result) => { session = result.session didLogin() }) } // logout and remove session from storage function logout() { document.body.classList.remove('logged-in') session.remove() } // called when session was restored or created function didLogin() { document.getElementById('account-name').textContent = session.auth.actor document.body.classList.add('logged-in') } // transfer tokens using a session function transfer() { const action = { account: 'eosio.token', name: 'transfer', authorization: [session.auth], data: { from: session.auth.actor, to: 'teamgreymass', quantity: '0.0001 EOS', memo: 'Anchor is the best! Thank you <3' } } session.transact({action}).then((result) => { document.getElementById('log').innerHTML += `Transaction broadcast! ${ result.processed.id }n` }) } // ¯_(ツ)_/¯ window.addEventListener('keypress', (event) => { if (session && (event.key === 'F' || event.key === 'f')) { transfer() } }) </script> <style> .logged-in #login-ui { display: none; } #app-ui { display: none; } .logged-in #app-ui { display: block; } </style> </head> <body onload="restoreSession()"> <div id="app-ui"> <p>Welcome <b id="account-name">foo</b>!</p> <ul> <li><button onclick="transfer()">Send an homage to team Greymass</button></li> <li><button onclick="logout()">Log out</button></li> </ul> <p><small>Press F to pay respects</small></p> <pre id="log"></pre> </div> <div id="login-ui"> <button onclick="login()">Login</button> </div> </body> </html>EOSIO Signing Request (ESR) 协议有唤起登录 / 支付和二维码登录 / 支付两种形式,通配手机、电脑等不同设备,支持多交易。
和其他主流协议对比:
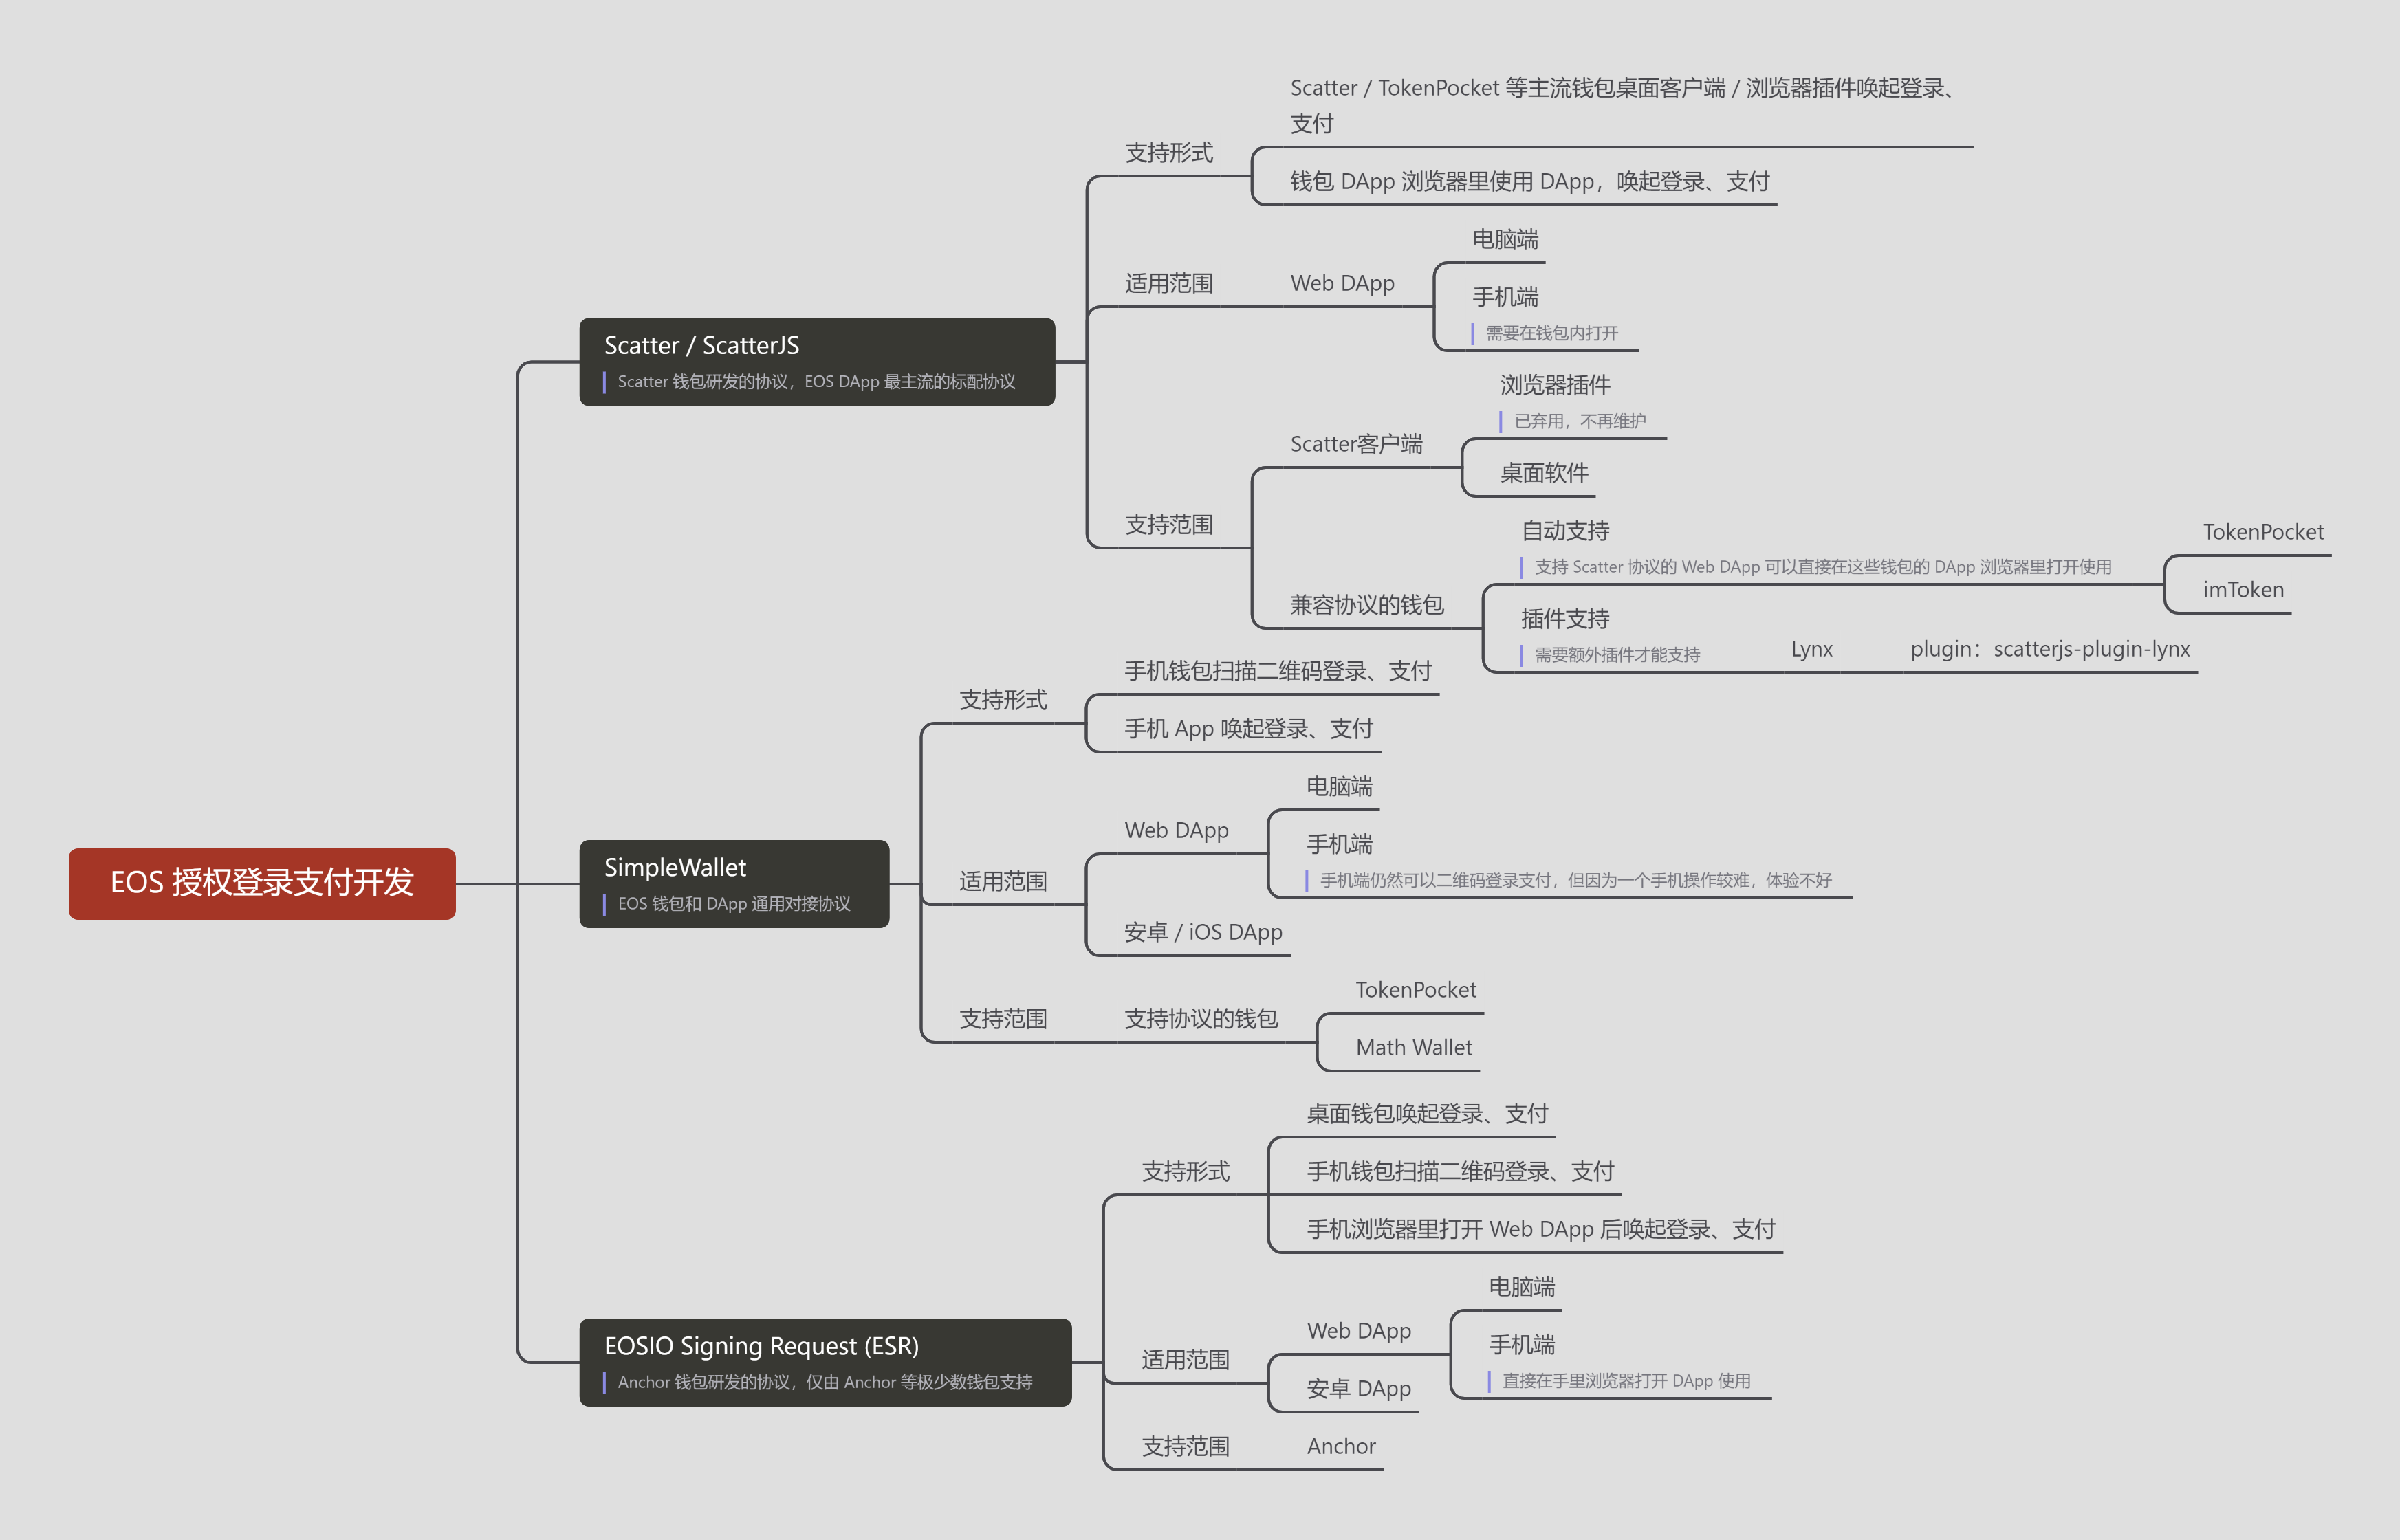
幕布源文档:https://www.mubucm.com/doc/1L0iVwiMCJ
在我的接入使用中,在产品功能涉及多签的前提下,操作能正常进行,所以至少就目前的体验来讲,ESR 协议对 eosjs2 的操作能很好支持。
总的来说,ESR 协议的原理和接入并不复杂,可以很快速实现,个人总结主要有下面几个需要注意的坑:
link.login()之前需要先link.restoreSession(),如果有可恢复 session 就直接用恢复 session,不再link.login()。另外注意link.restoreSession()出来的值直接是 session;- session 是个伪对象,从其中取 auth 进行操作经常会有各种问题,个人经验取 auth 时最好使用模板字符串方式像这样取:
auth = `${session.auth}`; session.transact如果报错,错误信息的 type 是 object(似乎又是伪对象),实际打出来是字符串。所以如果有类似alert( typeof(e)==="object"? JSON.stringify(e) : e );的代码,会导致 alert 空对象{};- ESR 协议支持多交易,但在官方文档代码示例中,缺乏多交易示例。可以看到在上面代码示例中,单交易是直接传入 JSON 而不是 JSON 数组的,如果直接传入多交易的 JSON 数组,会报错。ESR 协议中
.transact多交易数组,需要将键从action改为actions,即以session.transact({actions:交易 JSON 数组})的格式发起交易。


